There are times when I want to see an old post shared by a page. But that is buried so deep underneath that it becomes an humongous task to scroll down and retrieve it. I am talking about a page which has more than 8000 posts. You need to be Indiana Jones to find the old posts. But being a programmer has its own perks! :). I undertook a small project last week. I had to scrap the posts of a Facebook page, archive them and make it available as a blog on the internet. Scraping the posts seemed easy enough. Facebook always has awesome features for developers. Their technology is very powerful! Starting from GraphQL to ReactJS, React-Native, and WordPress and many more. It’s sure one of the best companies that promotes Open Source Programming. Kudos to Facebook!. Coming to my project. To test the posts scraping, Facebook provides a handy, easy-to-use tool called the GraphAPI Explorer. One can easily create and test their API calls to the Facebook API. So first we need the Page ID of the page we want to scrape. Though page ID isn’t something secret, it isn’t directly available to us. We need to search the source code of the page for a field ‘page_id’ to get it. Let’s scrape the page of Facebook Engineering for illustrating the process.
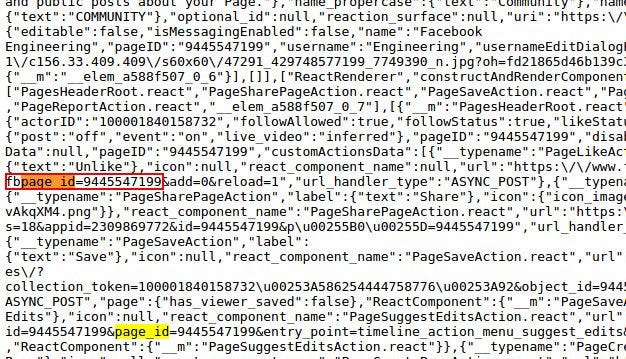
Now this number is the ID of the page we want to scrape. So to test our API call, we use a GraphAPI explorer for a test case. We also need a page access token to use it. This is easily available on the explorer page.
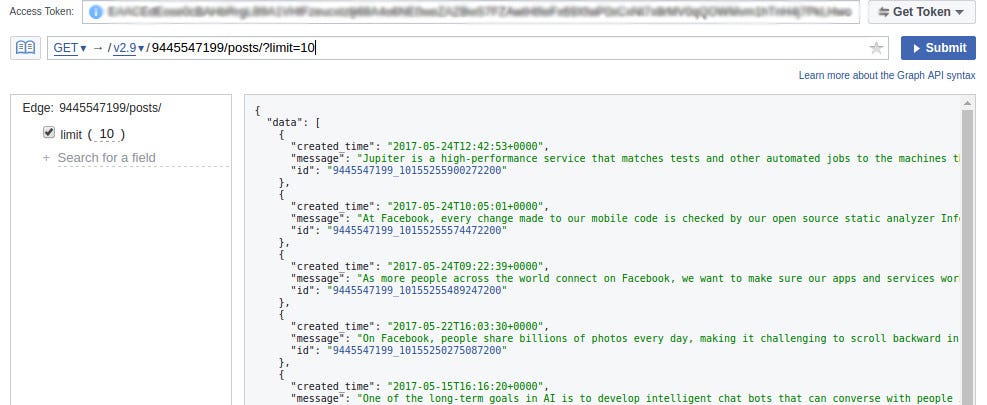
Our API call will be :-
https://graph.facebook.com/v2.9/{page_id}/posts/?limit=10 . ‘limit=10' specifies the number of posts we want to see in a single page. If we run this, we see a JSON object of our the required data.
Voila! We are ready to scale it up. Now to automate this, I wrote the following Python script.
import requests
import json
import os

page_id = os.environ['page_id']
limit = 100  # since we are scaling this, we should scrape large amounts at a time.
access_token = os.environ['access_token']

uri = "https://graph.facebook.com/v2.9/{}/posts/?limit={}&access_token={}"
url = uri.format(page_id,limit,access_token)

has_next_page = True
after = ''
data = []
c = 0
while has_next_page:
	r = requests.get(url)
	j = json.loads(r.content.decode("utf-8"))
	after = '' if after is '' else "&after={}".format(after)
	url = url + after
	for i in j['data']:
		try:
			type(i['message'])
			data.append([c,i['created_time'],i['message']])
		except Exception:
			pass
        c = c + 1

	if 'paging' in j:
		after = j['paging']['cursors']['after']
	else:
		has_next_page = False

json_data = {'data':[]}
for i in data:
	json_data['data'].append(i)

json_data = json.dumps(json_data)

with open('data.json','w') as f:
	f.write(json_data)  # data.json file is the required output
After running this, we get all the posts of the page in data.json file. Now comes the part where we use this data to generate our static site.
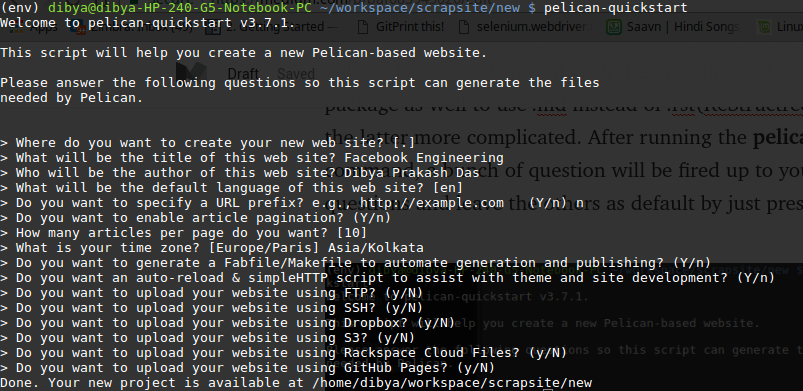
The most preferred one is Jekyll. But I went with Pelican. Because, Why not? ;) Although, on a serious note, I preferred using Pelican cause I found its tutorial much simpler. Plus, its based on Python which I’m comfortable with. So to start off, head over to Pelican Docs to get started with the installation. I installed markdown package as well to use .md instead of .rst(ReStructredText), because I found the latter more complicated. After running the pelican-quickstart command, a bunch of question will be fired up to you. Fill up the relevant questions and leave the others as default by just pressing return key.
Cool! Everything’s setup now. Now to generate you site you must add the contents. Make a new folder named ‘content’ . This is where we will add all our contents in .md format. Here we will use our scraped posts from the data.json file. Copy that file to the website root directory. To convert this, I wrote another python script (Note: You may have to make modifications according to your needs).
After running the python script in the website root directory, we have all our posts in content folder in .md format, all ready to be used by pelican. Now you have to add a few lines to the pelicanconf.py file present in your root directory. Add these anywhere inside the file. This will sort the files in most-recent-first order .
NEWEST_FIRST_ARCHIVES = True
ARTICLE_ORDER_BY = 'reversed-date'
Now run :- pelican content -o output -s pelicanconf.py
Hopefully if there aren’t any errors, you will have your generated HTML files in the output folder.
Then running:- make devserver will show how your website looks by running a local server. This is how our generated static site looks!


Isn’t this amazing! You can see all the posts made anytime in a cleaner, distraction-less view. This is the default theme provided by Pelican. There are hundreds more available which you can use instead of this. Stop the server by typing :- make stopserver
Final steps. To host this website you can use your own hosting website or Github free static site hosting. We can host this site on on a user page or a project page. You do not have to make much changes. Just add your ‘SITEURL’ in publishconf.py file. Open it and update that field with your site name.
Ex:- https://dibyadas.github.io is my site.
So my field changes to :- “ SITEURL = ‘https://dibyadas.github.io’ ”
Now run this :- pelican content -o output -s publishconf.py
And you get your site in the output folder. cd into the folder and push it to your Github branch. Once done, you will see your static site live in action!
Although this is pretty basic and rudimentary, Pelican has a option of adding plugins. And there are a lot! It can improve your webiste features to a great extent.
Hope you enjoyed reading this!
Feel free to ping me if you need any help.